Skyliner w/ Unique engine mount

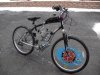
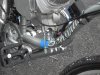
Here she is, enjoy. Note my "secret" engine mount on the front. It 3 bolts, two on the sides and one through the frame. VERY stable and secure. I buy the metric threaded rod from Ace hardware. I also use metric couplers as nuts. The couplers grab a ton of thread and allow me to really apply some serious torque to the studs. The studs are fairly soft and bend around the frame for the install.

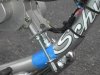
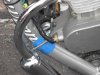
The blue tape is temporary to prevent frame scratching during the install process and will be removed later.
 

Attachments

  • Skyliner Bike.jpg
    Skyliner Bike.jpg
    111.2 KB · Views: 1,082
  • Skyliner Front Mount 2.jpg
    Skyliner Front Mount 2.jpg
    86.8 KB · Views: 740
  • Skylienr Front Mount 1.jpg
    Skylienr Front Mount 1.jpg
    65.3 KB · Views: 688
  • Skyliner Front Mount 3.jpg
    Skyliner Front Mount 3.jpg
    62.8 KB · Views: 577
That's enginuety.
I probably with just a hardware store and no milling machine done the same thing.

PROPS!!
 
I used a similar Front Mount. I'd add some Rubber or Fiber Washers to the holes in Frame. The End Studs supply the clamping force, the Center Bolt is mostly a guide, and could
be dampened. The Coupler Nuts are good, even better with a smear of LocTite Gel.

My mount uses a flat plate, leaving a half moon hole [ motor mount ] I used a
rubber chair tip as a vibration dampener, works nice I guess ? Never rode a Skyhawk that didn't have one. [ Too cold now ]
 
what is the size bolt or thread count that i need .. i lost my back motor mount bolts.. they vibrated out and i ride mine every day .. currently for a month with out the bolts.. almost lost the spacer because of it ..
 
Well done. That looks very strong. The only possible downside is the threads scratching into the frame on the sides, but since the mount is surely very rigid, I don't know if it will do more damage than just scratching the first time.

I used a through-bolt to mount mine, with a washer stack like that. I only used one bolt though, with 2 short bolts holding the engine to the plate. So far so good, but it is not very high off the downtube.

PM if you want to know how to build a good spring tensioner setup for about $20 or less from go-cart parts.
 
The Rear mounts are probably M6 [ same as front ? ] Studs are a good idea. I cut the heads off all thread M6 screws for cheapo studs. M6 Coupler Nuts provide extra thread, and an easy to grip hex head. Check Auto Parts Store * some * sell hardware cheap.
Hardware stores with metric assortments, let you buy what you need.
 
beware of the bolt through the frame

The last time I tried that my engine cut the seat tube like a hacksaw blade. It took awhile, but I had to replace the frame.

Maybe the tubing on that frame is thick enough to damp the engine buzz so that it will stay stable. What I did for my current frame was to order a oversized mounting kit from Sick Bike Parts, I will let you folks know how it works out.

Mike Frye
 
I sanded frame tube bare before metalworking. When I Brazed the front mount, I also did the sheet metal screw head to the mount to prevent cracking frame. I also did not drill through frame. I can see how a loose bolt could damage frame. I could have not used long front studs, but wanted the extra clamping force of a U clamp on bottom tube.
As far as studs hitting frame, the frame was dimpled to obtain a straight run to u clamp.
I think a lot more R + D needs to be done, as the tendency for mountain bike builders is to give you a fat downtube and top tube, both headaches in power conversion, and reasons for building a cruiser bike instead.
 
Try looking around for used Trek mountain bikes from the late 80's to early 90's, steel frame made-in-USA bikes. They should have smaller tubes than a lot of bikes made recently. Most are rigid bikes with cantis or v-brakes, but if you are clever you can install a 1 1/8 threadless fork on them, or get a v-brake springer fork from the MB vendors.
 
Back
Top