Marktur
Member
So I decided after seeing a bunch of home-made lights, that I'd give it a try as well. I saw 2 different lights on Instructables.com and made a hybrid...
I think I spent under $35, and wait until you see the results! (This includes a $25 lead-acid motorcycle battery).
Components:
Tools needed:
OK, let's build it!
1. Drill a 1/4" hole in the middle of the end cap for the wires to come through
2. Drill a 1/4" hole in the side of the end cap (centered) for the mounting bolt.
3. Drill (4) 1/16" holes (N, S, E, W) into the rim of the largest side of the PVC connector pipe (The screws and washers will act as retainers to hold the lightbulb in.
4. Connect the Conduit Connector to the end cap using the Bolt, Nut, washer (on the inside), and lockwasher (outside)
5. Now screw the PVC extension onto the PVC end cap
6. Crimp the wires (red and black) to the female slide connectors. Squeeze one of the two pieces that are rolled a bit tighter so that it grips the connector spike. Do this for both wires, then wrap with electrical tape or shrink tubing so it's like a plug.
7. About 3-4" behind the plug, make a knot, then thread it through the end cap. The knot will stop the plug from being pulled out by accident.
8. Now insert the switch into the Red wire (cut the wire, then solder/crimp the switch inline), and secure it to the end cap in a second hole (whatever size you need for your switch, or you can mount the switch using another conduit connector right to your handlebars (that's what I did).
9. Sit the light on the end flush, then use the 4 screws and washers to retain it.
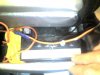
10. Now mount the light to your handlebars, and run your wires to your power source. In my case, I put a motorcycle battery in my rear bag.
11. I attached the black wire directly to the batteries "-" post, and I attached the red wire to one side of the fuse, then attached the other side of the fuse to the "+" post on the battery, thus completing the circuit.
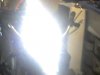
12. Now the fun part: Shut the lights, and turn on your bike light! Woo-hoo! Look into the light! You will see a big white dot in front of your eyes for a good couple of minutes now! Neat-o!
I think you should make sure you aim it right at eye level for drivers in cars, since they just don't see us. Now they'll see a blinding light and KNOW we're on the road. In this case, it's "us or them", and based on previous experience, I really don't care if they get ****ed off at the bright light, in fact I'm glad, because now I know I'm visible!
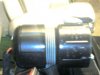
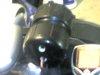
You can see from the pictures that the light looks great - I painted it black, and it's actually smaller than the Bell Light next to it. I will keep that on my bike, too, for the flashing LEDs.
OK, here's some pix...unfortunately from my camera, of the finished product. I'm thinking of making a 20W "low beam" too, so I'll use a real camera and catch each step.
I'm proud of myself, had fun, and I think I saved a bunch of money compared to what I've seen at bike shops and eBay for seriously bright and rechargeable lighting.
Hope my little tutorial makes sense!
Cya!
Mark
I think I spent under $35, and wait until you see the results! (This includes a $25 lead-acid motorcycle battery).
Components:
- Conduit mounting bracket in the proper size for your handlebars (the smallest, I think)
- 1 1/2" PVC End cap
- 1 1/2" PVC Threaded Extension
- 6' Red wire
- 6' Black Wire
- (1) set of connectors (optional, so you can remove the light or battery)
- (2) insulated Female "slide" connectors. I used a wire cutter to gently crimp the lead from the light because I couldn't find the proper plug component.
- 12V 35W 1 1/2" halogen light (MR16) WITH LENSE
- 4 small screws and washers
- 12V Battery of your choice.
- Toggle Switch
- 1/4"x1" Thumbscrew (bolt) with wingnut
- Nut, bolt, lockwasher, regular washer (to attach conduit holder to mount the light)
- 15A Fuse and inline holder.
Tools needed:
- 1/16 and 1/4 drill bit and drill
- Screw driver
- wire cutters
- Shrink tubing or electrical tape
OK, let's build it!
1. Drill a 1/4" hole in the middle of the end cap for the wires to come through
2. Drill a 1/4" hole in the side of the end cap (centered) for the mounting bolt.
3. Drill (4) 1/16" holes (N, S, E, W) into the rim of the largest side of the PVC connector pipe (The screws and washers will act as retainers to hold the lightbulb in.
4. Connect the Conduit Connector to the end cap using the Bolt, Nut, washer (on the inside), and lockwasher (outside)
5. Now screw the PVC extension onto the PVC end cap
6. Crimp the wires (red and black) to the female slide connectors. Squeeze one of the two pieces that are rolled a bit tighter so that it grips the connector spike. Do this for both wires, then wrap with electrical tape or shrink tubing so it's like a plug.
7. About 3-4" behind the plug, make a knot, then thread it through the end cap. The knot will stop the plug from being pulled out by accident.
8. Now insert the switch into the Red wire (cut the wire, then solder/crimp the switch inline), and secure it to the end cap in a second hole (whatever size you need for your switch, or you can mount the switch using another conduit connector right to your handlebars (that's what I did).
9. Sit the light on the end flush, then use the 4 screws and washers to retain it.
10. Now mount the light to your handlebars, and run your wires to your power source. In my case, I put a motorcycle battery in my rear bag.
11. I attached the black wire directly to the batteries "-" post, and I attached the red wire to one side of the fuse, then attached the other side of the fuse to the "+" post on the battery, thus completing the circuit.
12. Now the fun part: Shut the lights, and turn on your bike light! Woo-hoo! Look into the light! You will see a big white dot in front of your eyes for a good couple of minutes now! Neat-o!
I think you should make sure you aim it right at eye level for drivers in cars, since they just don't see us. Now they'll see a blinding light and KNOW we're on the road. In this case, it's "us or them", and based on previous experience, I really don't care if they get ****ed off at the bright light, in fact I'm glad, because now I know I'm visible!
You can see from the pictures that the light looks great - I painted it black, and it's actually smaller than the Bell Light next to it. I will keep that on my bike, too, for the flashing LEDs.
OK, here's some pix...unfortunately from my camera, of the finished product. I'm thinking of making a 20W "low beam" too, so I'll use a real camera and catch each step.
I'm proud of myself, had fun, and I think I saved a bunch of money compared to what I've seen at bike shops and eBay for seriously bright and rechargeable lighting.
Hope my little tutorial makes sense!
Cya!
Mark